128 WAYS MIDI WILL CHANGE YOUR LIFE AS A LIVE GUITARIST
MIDI – THE INDISPENSABLE TOOL IN YOUR MUSIC MAKING PROCESS?
Have you always wanted to be able to rock all your different guitar tones on stage without having to resort to tap dancing on your pedal board as you try and switch between sounds on the fly? If so, MIDI – or Musical Instrument Digital Interface, to use its full name – could be the way forward. Here, we use the GrandMeister 40 Deluxe as an example of the possibilities MIDI offers you as a live player.
MIDI was originally invented by synthesizer companies for keyboard players, and it changed the way music is produced dramatically. It’s mainly used to send note messages that trigger sounds from another instrument – in most cases, on stage and in the studio, from a keyboard or sequencer to a sampler or sound generator.
Another great feature of MIDI is the opportunity to switch sounds by the use of so-called program changes, which is the main feature for guitar players. At a touch of a button, you can change the channel of the amp and the effects program on your external effects device simultaneously. For many guitarists, MIDI put an end to dancing on several stomp boxes to switch from your rhythm to your solo sound – and vice versa.
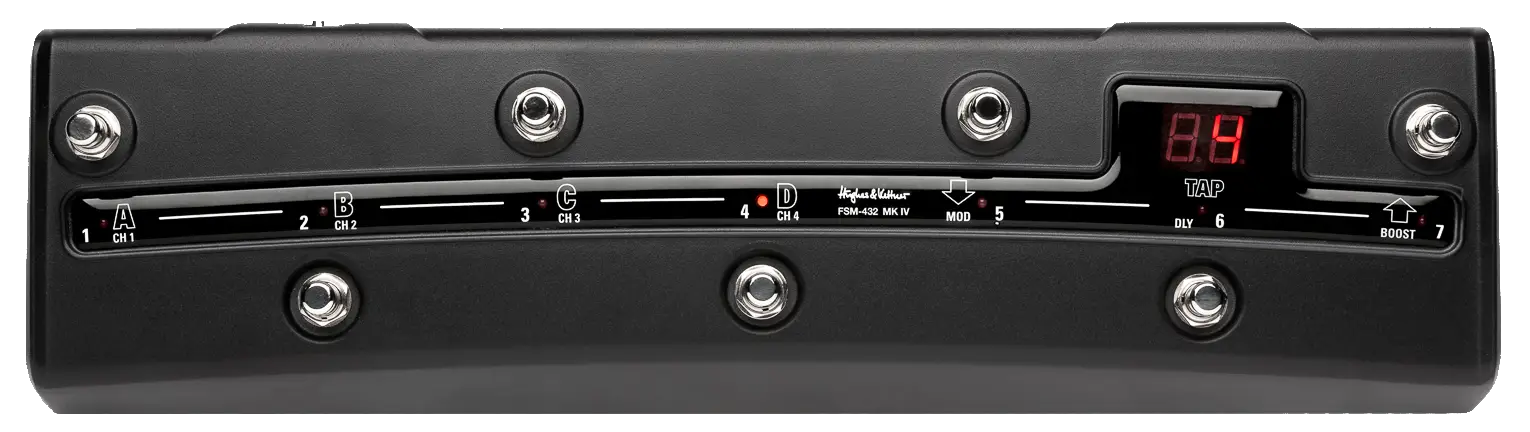
The Hughes & Kettner FSM 432 MK IV MIDI Board is ideal for controlling the MIDI functions on your amp.
Part 1: Let´s start with the basics – direct access to all switching functions
Switching presets is only half of the story, though. You can even access every single switching function within a preset with the help of so-called MIDI continuous controllers. A continuous controller (CC) is a MIDI message that can transmit 128 different values (from 0 to 127). There are 128 different continuous controllers available (#001 to #128).
Some of them are standard, like CC #007, which always controls Volume on any MIDI device, or CC #001, which always controls the level of modulation.
Each function on the GrandMeister 40 is assigned to a dedicated MIDI CC#. MIDI foot controllers like the Hughes & Kettner FSM 432 MK IV, the Rocktron All Access, Custom Audio Electronics RS-5, or any sequencing software like Apple Logic, Steinberg Cubase or Pro Tools are examples of products that will allow you to directly access the GrandMeister 40’s various functions.
This is for you if you want to be in a preset, but directly switch your Boost, Delay, Modulation FX or Power Soak settings in and out without changing presets. That means that, if you want to switch to 1 Watt for a rhythm part without leaving your preset, you can do it! The many possibilities are yours to explore.
Here’s another example. On CC# 031, you can select the channel. The GrandMeister 36 has four channels, so the range of available values (128) have to be divided by 4 to get the range of values for each channel. Therefore, values from 0 to 31 will give you the ability to directly access the Clean Channel at any time; the Crunch Channel is on 32-63, Lead 64-95, and Ultra 96-127. You can use any value within each range to get what you want – for example, value 20 on CC#31 will switch to CLEAN, while 100 will switch to ULTRA.
CC# 052, meanwhile, gives you direct access to the switching the Modulation FX on or off. With on/off switches, 128 has to get divided by 2, meaning that values from 0-63 will switch the FX on, and values from 64 to 127 will switch them off. Check out the chart further down the page for complete CC#s for switching the GrandMeister 36’s various functions.

Whatever your MIDI controller looks like, it can be an indispensable tool in your music making processes.
Part 2: Creative expression for experts – real-time control
What about changing your sound in real time, just like turning a knob, but without touching any knob with your hands?
This is a feature that keyboard players use very often. With a MIDI expression foot pedal, you can add a string pad sound while playing a piano sound, or change the filter cutoff of a synth sound, or adjust the speed of a chorus effect on your Fender Rhodes sound while you play with both hands.
But how can a real analogue tube guitar amp benefit from that, and how does it work?
Well, the GrandMeister 36’s Smart Rotary Controls not only allow you to recall any position stored in a preset, but you can even tweak and control your tone in real-time by connecting a standard expression pedal to the controller input (1/4” jack) of any MIDI pedal that offers assignable pedals. This works for any of the controls, not just Volume.
Imagine being able to control your Gain level with a pedal for violin effects instead of turning the volume pot on your guitar. Or, instead of switching from a scooped tone with no mids to a biting lead tone, being able to morph your sound while playing by bringing in more mids whenever you like!
It’s important to note that, while recording, you can store all MIDI values in the song itself; or even change controller values (programmed or on the fly) while you’re tracking. You can increase the Gain with an expression pedal while you play, or even program a mids EQ sweep into your digital audio workstation!
One thing’s for sure: making full use of your MIDI opportunities will open up a whole new world of creative expression for you on stage – and in the studio too.

In this small rack, the Lexicon MX 400 is addressed via Midi, individually for each preset of the Black Spirit 200. Midi is a universal language and always works the same way.
OK, back to our GrandMeister anyway. To make full use of the Hughes & Kettner FSM 432 MK IV MIDI board’s controller functions, two controller inputs are on offer. You can connect expression pedals or single footswitches to these two 6.3 mm (1/4″) jack plugs, and you can use both to assign additional control functions for the GrandMeister 40. This means that all of the amp’s programmable functions can be remote controlled.
In practice, the controller numbers can be assigned to the two inputs (Control 1 and Control 2), and the parameters of the assigned functions can now be controlled via external expression pedals or footswitches connected to these inputs. For instance, you could control the reverb of the amp’s FX module using an expression pedal (like we do in the short video clip above, in fact). You can also switch the noise gate on and off with an external footswitch or change the amount of gain while playing – and, crucially, without having to take your hands off your guitar!

Connecting expression pedals and additional footswitches to a MIDI board like the FSM 432 MK IV can bring you many additional tonal benefits, both live and in the studio!
Perhaps the most useful functions for live guitarists, though, are being able to remote control the Boost (without changing presets) using a footswitch, as well as controlling Volume with an expression pedal. As you can see in the chart below, assigning controller number 07 to one of the control inputs and connecting an expression pedal lets you remote control the volume. The switching function of the Boost can be remote controlled, by assigning controller number 64 to the other control input and connecting a footswitch to it.
Heads-up: Generally, all functions can be controlled with an expression pedal and/or a footswitch. The control type of each function determines which one of the two makes more sense to use. Continuous functions, or functions with a control range of more than two sectors, are predestined for the use of an expression pedal.
For simple switching functions (that is, those with two sectors: on/off) it makes more sense to use a footswitch. If you assign a controller number with more than two sectors to a footswitch, then you can only switch between the first and the last sector. If you use an expression pedal, the control range of the pedal will be divided in equal parts by the number of sectors of the assigned function.
For example, if you assign controller number 31 (which looks after channel switching, and has 4 sectors) to a footswitch, you can only switch between the first sector (which is the Clean channel) and the last sector (the Ultra channel). Using an expression pedal, you can switch between all four channels, with each channel occupying a quarter of the pedal’s control range.

A rear view of the Hughes & Kettner FSM 432 MK IV MIDI Board. Note the ports for MIDI In and Out on the right, and the Control 1 and 2 inputs (on the left), which let you connect additional controllers like expression pedals.
Assigning controller numbers with the FSM 432 MK III MIDI board
The assignation of functions (controller numbers) to the two control inputs works as follows:
• Control 1:
To access the edit mode, press and hold the buttons Tap and D simultaneously until the display shows the controller number and the dot behind the second digit starts flashing. You can now change the controller numbers using the Up/Down buttons. Store the selected controller number by pressing D. The dot stops flashing, and the footswitch returns to normal mode.
• Control 2:
Press and hold Tap and C until the display shows the controller number and the dot behind the first digit starts flashing, then release them. Then, change and select your preferred settings using the same method as with Control 1 above. Finally, store and exit with button C. Simple!
Part 3: Switching Functions and Ranges
Channels: CC# 0-31
Values for Clean Channel: 00-31
Values for Crunch Channel: 32-63
Values for Lead Channel: 64-95
Values for Ultra Channel: 96-127
Effects:
Mod-FX On-Off: CC# 52
Values: 0-63 Off – 64-127 On
Delay On-Off: CC# 53
Values: 0-64 Off – 64-127 On
Reverb On-Off: CC# 54:
Values: 0-63 Off – 64-127 On
Hint: Mod-FX, Delay, and Reverb must be programmed into your original preset in order to switch on/off.
FX Loop On-Off: CC# 55
Values: 0-63 Off – 64-127 On
Noise Gate On-Off CC# 63
Values: 0-63 Off – 64-127 On
Boost On-Off: CC# 64
Values: 0-64 Off – 64-127 On
Power Soak: CC 30#
Silent Recording Values: 0-25
1 Watt values: 26-51
5 Watt values: 52-77
20 Watt values 78-101
40 Watt values 102-127
Hint: You can choose any value within the required range. For example: 10 for Silent Recording, 30 for 1 Watt, 60 for 5 Watt, 90 for 20 Watt and 120 for 40 Watt.

Here’s a handy graphic representation of all the GrandMeister’s MIDI switching functions and ranges
Controller Functions
1 Modulation Intensity
4 Delay Time, 10ms steps (double steps), 5ms to 1360ms
7 Volume (soft*)
20 Gain (soft*)
21 Bass
22 Mids
23 Treble
24 Resonance
25 Presence
26 Modulation speed (always for the active modulation effect, 64 steps)
27 Delay feedback
28 Delay volume
29 Reverb volume
30 Power Soak switching (5 sectors)
56 Gain (hard)
57 Volume (hard)
*Heads-up: “Soft” for controller numbers 07 (Volume) and 20 (Gain) refers to the softening of the change in value once you move the expression pedal. This helps to avoid abrupt volume changes in case of a remarkably large difference between the value of the controlled parameter stored in the preset and the expression pedal’s starting position. However, should you choose to use such abrupt volume changes, e.g. as a stylistic device, you can do so by assigning controller numbers 56 (Gain) and 75 (Volume) instead. These are referred to as “hard”.
Hopefully this guide has opened your eyes to some of the possibilities MIDI can give you as a live guitar player. For those guitarists brave enough to use it – and we know it’s a big step into the unknown for many! – it’s a wonderful system that can really expand your sonic horizons when you rock on stage or in the studio.
If you have any questions, though, feel free to give us a shout! We’ll try and answer them as best we can.